RapidWeaver Consulting
Websmith
Are you building your website with RapidWeaver, or thinking about doing so? Whether you've run into some hurdles with your website project, you can't find the time to work on it, or you simply want an outside perspective, we'd be glad to help.

Sharing your files with Dropbox
We will use Dropbox to share your RapidWeaver project and other files as part of my consulting service. Email can get bogged-down with larger attachments, and organization is more difficult when sending multiple files back and forth through email.
If you have not used Dropbox before, then this guide will provide the information you need to get set up with Dropbox and share your files.
If you have not used Dropbox before, then this guide will provide the information you need to get set up with Dropbox and share your files.
Step 1: Join a Shared Dropbox Folder
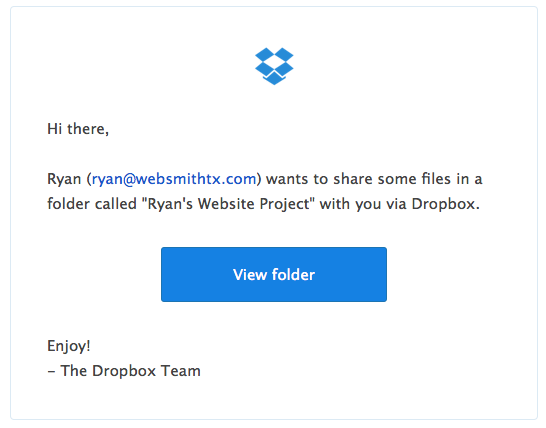
I will create a Dropbox folder that we will use and I will share this folder with you. When the folder is shared, you will receive an email invitation to join the folder. The email will look similar to the image on the right. Click on the "View folder" button to get started.
If you have not yet received an invitation to join a shared Dropbox folder and you would like to go ahead and continue with setting up Dropbox, then you can create an account here.
If you have not yet received an invitation to join a shared Dropbox folder and you would like to go ahead and continue with setting up Dropbox, then you can create an account here.
Step 2: Create a Free Dropbox Account
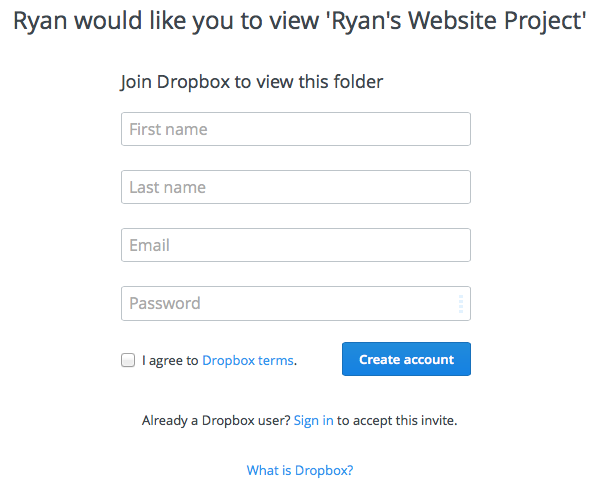
After clicking on the "View folder" button in the email, your web browser will direct you to the Dropbox website, where you will be prompted to join Dropbox by creating a free account. Complete the form and click the "Create account" button to continue.
Step 3: Download the Dropbox Application
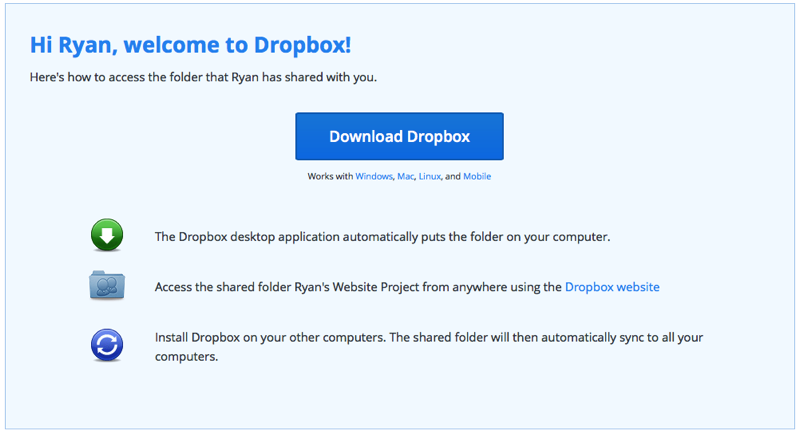
Once you create an account, you will be prompted to download the free Dropbox application. Click the Download button.
Step 4: Open the Downloaded Dropbox Disk Image
Once you click the Download button from Step 3, you should see a screen like the image to the right.
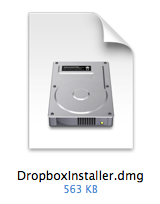
Once the download is complete, the file DropboxInstaller.dmg should be located in your Downloads folder. The file will look like the image below. Double-click this file to open the Disk Image.
Once the download is complete, the file DropboxInstaller.dmg should be located in your Downloads folder. The file will look like the image below. Double-click this file to open the Disk Image.

Step 5: Install the Dropbox Application
After you double-click on the DropboxInstaller.dmg file, you should be presented with a Finder window like the image to the right.
Double-click the Dropbox.app icon and follow the instructions to install Dropbox on your computer.
Double-click the Dropbox.app icon and follow the instructions to install Dropbox on your computer.

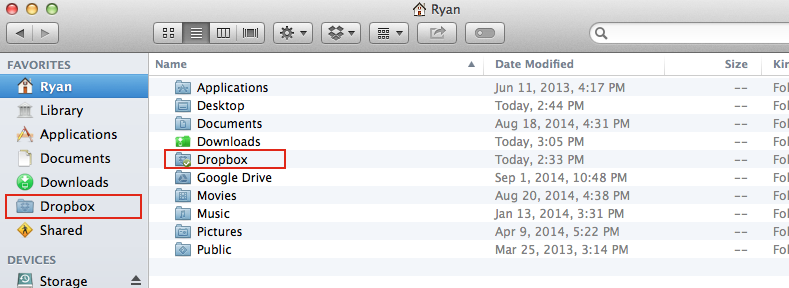
Step 6: Locate Dropbox on Your Computer
Once you've successfully installed the Dropbox application, you will be able to use Dropbox from your computer without the need to visit the Dropbox website.
Dropbox creates a folder in your Finder. It is typically made available as a shortcut from the Favorites sidebar in the Finder, as shown in the image below. If you don't find the Dropbox folder there, then look in your Home folder. In the image below, the Home (Ryan) folder is selected, and you can see the Dropbox folder there.
Dropbox creates a folder in your Finder. It is typically made available as a shortcut from the Favorites sidebar in the Finder, as shown in the image below. If you don't find the Dropbox folder there, then look in your Home folder. In the image below, the Home (Ryan) folder is selected, and you can see the Dropbox folder there.
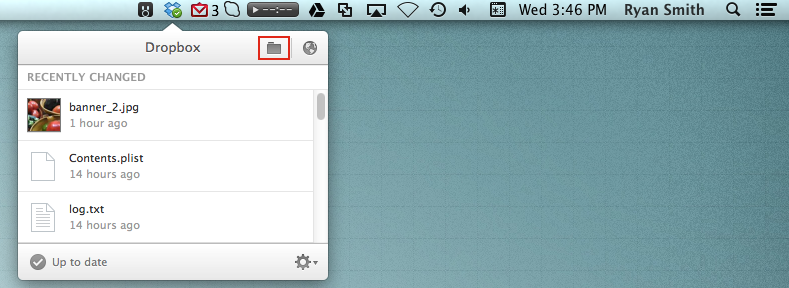
Dropbox also places an icon in your menu bar, near the clock. You can click this icon to access a panel with details, including a folder button (outlined in red below) that takes you to the Dropbox folder on your computer.
This panel also contains a list of recently changed files, a link to the Dropbox website, and account details such as the amount of storage you have used.
This panel also contains a list of recently changed files, a link to the Dropbox website, and account details such as the amount of storage you have used.
Step 7: Share Your Files
You are finally ready to share your files through Dropbox. Open the Dropbox folder on your computer, and inside you will find the folder that has been shared with you. The folder will typically be named "Your Name Website Project" -- you will use this folder to share your files.
Find and Compress Your RapidWeaver Project File
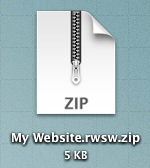
IMPORTANT: Please follow these instructions to ensure that your RapidWeaver project is safely shared through Dropbox. First, you will want to find your RapidWeaver project file. It looks like the file in the image to the right, and has the file extension .rw8 (RapidWeaver 8) or .rw (RapidWeaver 7). If you do not know where the project file is located on your computer, then you can perform a Spotlight search for .rw8 or .rw, which will find any RapidWeaver project files on your computer. Alternatively, you can open the project in RapidWeaver and choose File > Save As to create a new copy. Save the copy to your Desktop, or to another location where you can find it.
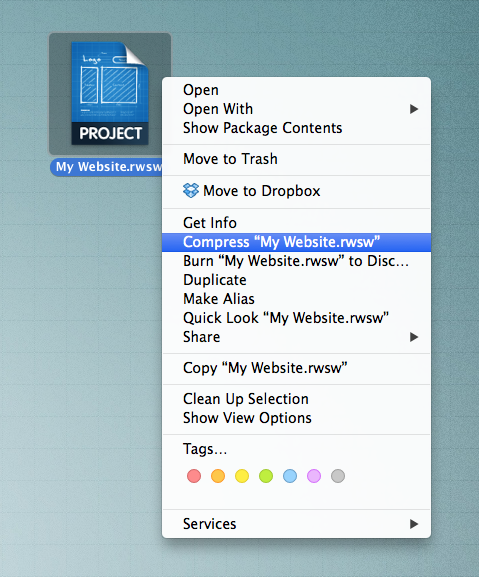
Once you have located your RapidWeaver project file, right-click (or CTRL+click) to reveal the context menu as shown in the image to the right. Select the Compress option. This will create a zip file (image below) in the same location on your computer.
Once you have located your RapidWeaver project file, right-click (or CTRL+click) to reveal the context menu as shown in the image to the right. Select the Compress option. This will create a zip file (image below) in the same location on your computer.
Drag the zipped project file into the shared folder inside of the Dropbox folder on your computer. As soon as you place the file there, Dropbox will begin to sync (upload) the file. If you look at the Dropbox icon in the menu bar, you will see a spinning animation as it uploads. Please allow the upload to complete (green check mark on icon) before you shut down or suspend your computer.
You can use Dropbox just like any other folder in your Finder. If you will be sending a large number of files, then you can organize those files into folders inside of the shared Dropbox folder. For example, you might have a folder called Banner Images that contains your website's banner images, or you might organize files into folders based on the pages they will be used in: Home, About Us, Services, etc.
A Few Additional Notes
If you correctly follow the steps below, then your files will appear inside of the shared Dropbox folder that I create, and I will be able to access those files. I will do my work with the files you send, and then I will place the files back inside of the Dropbox folder for you to retrieve.
IMPORTANT: Once I send the RapidWeaver file back to you, please remove the zipped RapidWeaver project from the Dropbox folder before you unzip it. Simply drag the zipped file to another location on your computer, such as the Desktop, before you unzip it. You never want to have an unzipped RapidWeaver project file inside of the Dropbox folder, as this can possibly cause the file to become corrupted. The RapidWeaver project file is a package of many files, and Dropbox can potentially corrupt this package of files if the project file is not zipped.
You can also use your Dropbox folder as a method of backing-up your website project, and any other files or documents as well, up to your storage limit, which is 5GB with a free account. You should already be backing-up your files to an external hard drive, but backing-up files with Dropbox will save them in a remote location. Your files will be private so long as you don't share those folders with anyone. Simply create new folders inside of the main Dropbox folder and add the files you want backed-up. Please remember to zip any RapidWeaver project files that you add there.
Finally, since you are only adding zipped RapidWeaver project files to Dropbox, your original RapidWeaver project file(s) will remain on your computer, so there is no risk of losing the file when you share it through Dropbox.
I hope that this guide has been helpful to you. Please contact me with any questions, and I look forward to working together with you!